Creating a Wireless Client Bridge
Wednesday, July 10, 2013 by Unknown
If you're using dd-wrt sp1, do not attempt this tutorial. You will not be able to configure a wireless client bridge in this version, so be sure to check your device's dd-wrt firmware version and update accordingly before starting this tutorial.
Assuming that your primary router is already flashed with dd-wrt v24 sp2 and setup with a home network with a LAN IP address of 192.168.1.1. If your primary router has a different LAN IP address, just adjust the IP accordingly to match that of yours and everything should work fine. There is no need to configure your primary router in this tutorial (although, in some cases - the wireless security needs to be changed to WPA2 Personal on both the primary and secondary router for it to work.)
Once you're done flashing your secondary router to sp2, turn your wifi connection off. Turning off your wifi connection while processing the config of your secondary router will prevent any errors or sudden disconnection that will result in a bricked router or even something worse.
Connect to the web GUI via a web browser (http://192.168.1.1) and enter your desired username and password. Navigate first to Wireless > Wireless Security. Change your wireless security to match that of your primary's router.
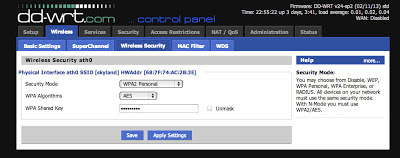 |
| Figure 1-1 |
After you've input the wireless security of your primary's router, click Save > Apply Settings. (Most people who has tried different Security Mode other than WPA2 Personal has encountered problems, thus using WPA2 Personal will prevent any connection errors.)
Navigate to Wireless > Basic Settings > Under "Wireless Mode" select "Client Bridge" and input your primary's router Wireless Basic Setting's information. Once you've completed that, click Save > Apply Settings.
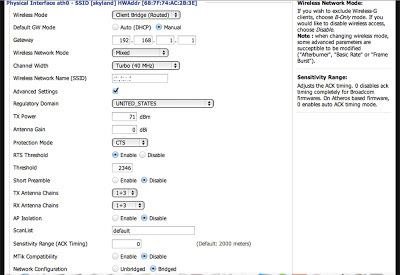 |
| Figure 1-2 |
Note: I set my ACK Timing to 0 because my device is an atheros, thus my ACK Timing is set to "Auto" because 0 = Auto in atheros devices.
Check to ensure all information has been inputed correctly and then navigate to
Setup >
Basic Setup. Because your primary router already has an IP address of 192.168.1.1, you will want to use another IP address that is available. In this case, I've used
Fing to derive all IP address in use and make my secondary router with an unused IP address. In this case, I've used 192.168.1.2.
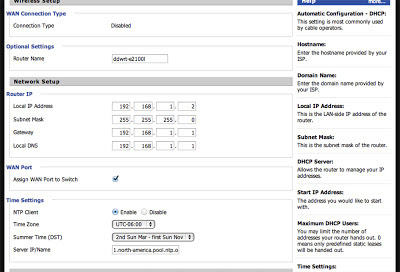 |
| Figure 1-3 |
Click Save > Apply Settings. Wait about a good 10 minutes and then navigate to your web GUI with the IP address you've set for your secondary router (client bridge)
Note: If you've enabled "Time Settings" on your primary router, change your secondary router (the client bridge) to match that of your primary router (AP). You can also leave your "Local DNS" at 0.0.0.0.
Next, navigate to Security and uncheck all boxes under "Block WAN Request" except for "Filter Multicast" and click Save. Once you've clicked Save, disable the "SPI Firewall" and click Apply Settings.
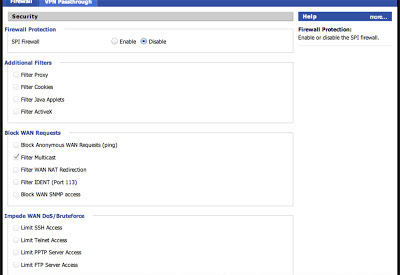 |
| Figure 1-4 |
Once you've applied your settings, navigate to Setup > Advanced Routing and under "Operating Mode" select Router.
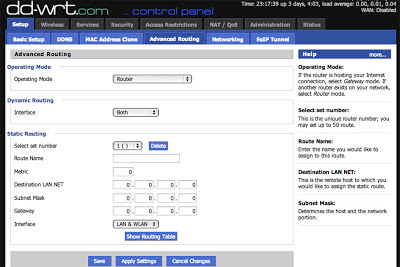 |
| Figure 1-5 |
Click Save > Apply Settings. And navigate to Status > Wireless and under "Wireless Mode" click Site Survey. Select your current wireless and click OK. It will then bring you back to the Wireless Setup page. Verify that all information inputed are correct and click Save > Apply Settings.
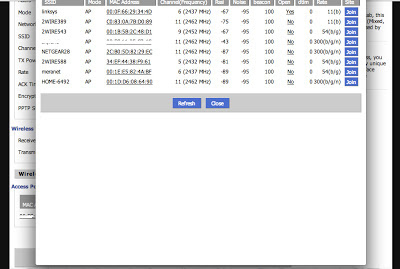 |
| Figure 1-6 |
Finally, navigate to
Administration and scroll down to click "Reboot Router". Upon completion of rebooting, you should be able to open a web browser and navigate to a website (ie.
http://www.google.com)
If you're able to connect to the URL, you've officially set up a wireless client bridge. You can connect both through the primary and secondary router's web GUI.
Tags:
Tutorials ,
wireless client bridge


0 Responses to “Creating a Wireless Client Bridge”
Post a Comment